Photo and Camera thread

P

Patrick

Guest
I just bought a new camera and I always have questions about how to use it, whats best etc...i am starting this thread so that I can ask these questions here because I have a feeling more than a few would know the answers. I had some correspondence with castevens and he mentioned a nikon d70 camera. didnt know what it was. looked it up. noticed that the pic i will post below was taken with it. made my new 400 dollar cam look like a piece of crap. my first question, to anyone who knows, is how do you do lengthy exposures so that if a street was being photographed the car lights would streak like in the below photo? is there a setting on most cams for this?

pop_d70_007.jpg
 
I was wondering the same thing several months ago myself, Patrick. Fairly often, cameras in the price range of what you have will have at least a simple "Manual" mode, meaning you can control the shutter speed and the aperture (or how much light is allowed through to the sensor). I have just begun to experiment with car light exposures without knowing much about how to properly take them. I use an old 35mm film SLR camera from the early 80's, which takes gorgeous photos.

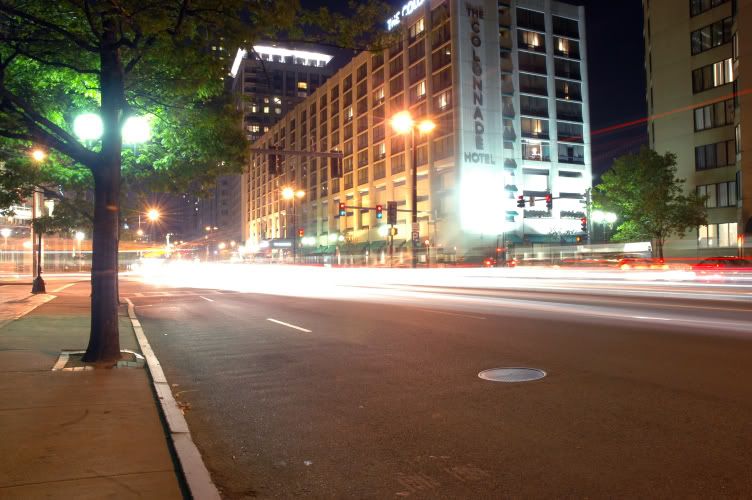
So one night on the Longfellow Bridge, with my tripod and camera set it up looking down onto Storrow Drive. I wanted maximum tail-light streakage without completely overexposing the entire frame. So, I closed up the aperture, set the shutter speed to bulb (allowing it to stay open until I let off the button) and held for 30 secs. This is what I was treated with (this is scanned print, not a scanned negative, so it looks like crap. The print itself is amazingly clear, but prints never scan well, ever. That horizontal light/dark line across the bottom 1/3 is a shadow from the footbridge, not a film problem):

Lights.jpg


I find its a delightful little insight of how Bostonian drivers find the lane lines around a corner mere suggestion.

This is where knowledge of what manual settings do comes in handy. First is shutter speed. The speed in the photo you posted, judging by how far the cars have moved in the frame is likely 1/2 sec. or so, if that. Then theres the aperture, or the blades within the lens that limit light. The smaller the aperture or f stop, or something including f, the more open it is allowing more light in, while the smaller the number, the less light is allowed in.

So, in my photo, I used an aperture, or f stop of f/22, the smallest aperture available on my lens. Like I mentioned, that allowed me to keep the film capturing car movement for a longer period of time without completely blowing out the whole shot with other light, like the lamp post.

So again, in reference to your photo, it likely used a small-ish aperture setting combined with that 1/2 sec or so shutter speed to capture the movement of the cars, the lights in the buildings all without overexposing any major portion of the photo.

I could go further in depth, but I have a way sometimes of saying more than necessary and find that it only caused confusion in the end. Basically, I guess I'm just saying check out your camera to see if it has a Manual or M setting and figure out how to use it.
 
wow, thank you so much for all of that, i will continue to play around with my cam and see what i can find. I think i found a setting that might do all the work for me, though. i can turn the nob on my cam to "aperture priority" setting and when i took a timed self portrait of myself moving my head in different directions it came out all blurry with the background still,,,sorta like what i would expect tail lights to come out looking like. i think it had a 10 second exposure or something in that neck of the woods. ill experiment tomorrow to see if this setting will work...thanks again and nice photo.
 
1. put the camera on a tripod facing your mouse.

2. put it on shutter priority, making the shutter speed 5, 10, 15, 20, 30 seconds, whatever you want.

3. push the shutter button with your left hand, have your right hand on the mouse.

4. keep your hand steady (not moving at all) for about half the shutter time (2.5, 5, 7.5, 10, 15 seconds)

5. QUICKLY remove your hand from the mouse, being careful not to move the mouse.

6. Let the remaining shutter time go by.

7. View the picture. I call it "ghost hand"

You should have a picture with a CLEAR mousepad, mouse, and corner of the computer (or something to that extent), and a ghosty-looking hand and forearm on the mouse

Do experiments like this to see how your camera works
 
Now, let me show you 2 pictures from the same night from the same basic place, one with long shutter speed, one with short.

The best thing about prolonged shutter speeds is dealing with water and reflections. The first picture shows a normal shutter speed at night, and captured the mini-"waves" in the reflecting pool, thereby not really well reflecting the buildings.

f2e4dc9f.jpg


In this picture, I used a long shutter speed. Let me try to explain what goes on here. You are a smart person, you should be able to understand (although its a little complicated). The "waves" in the pool are constantly bobbing up and down. Over long periods of time, like, say, 30 seconds, each point in the reflecting pool would have bobbed up and down X number of times. Since there is a long exposure, the camera more-or-less averages the "height" of the water over the entire time, thereby averaging the color reflected by the water. So therefore, you get a pretty clear reflection, as evidenced by the following shot, almost the same as above but with long shutter.

62508229.jpg
 
excellent pic, thats what i want to be able to take. i thought aperture priority setting would do it, because it worked last night, but not today...i will try shutter speed priority, but i dont know how to change the time of the shutter....ill play around more with it i guess. thanks!
 
Here is another 30 second shutter speed showing an extreme of what I am talking about, as you can see the entire reflection of all three towers. The reason it gets less accurate (more blurry) toward the bottom is because, because it is closer to the camera, the waves seem bigger and the thing that the wave is reflecting is further away, so the average is less accurate.

DSC_0014.jpg
 
excellent pic, thats what i want to be able to take. i thought aperture priority setting would do it, because it worked last night, but not today...i will try shutter speed priority, but i dont know how to change the time of the shutter....ill play around more with it i guess. thanks!

Thanks! Aperture priority, and shutter priority more-or-less do the same thing. Aperture is the size of the hole in the lens that allows in light. if you make the aperture a large number (22), the size of the hole will be this:

o

And therefore, to compensate, your camera will actually change the shutter speed to be longer (if you use shutter priority, it will conversley change the aperture to be a larger number, smaller hole, so that this doesnt happen:

2079170220060916413TcTCrk_ph.jpg


That is a long shutter speed with a large aperture hole, allowing in a lot of light.)

CONVERSELY (Still follow me?) if you are on aperture priority, and you choose a LARGE HOLE aperture, like this:

O

Then the shutter speed will be reduced by your camera so as not too let in too much light for too long (or else the above picture will occur)
 
So, basically what I'm trying to say is that when you're changing the aperture, you're forcing your camera to change the shutter speed. A picture with a BIG HOLE for aperture (say, f/3ish), and a VERY SHORT shutter speed can look almost identical to a picture with a SMALL HOLE for aperture (say, f/22), and a VERY LONG shutter speed

Except when things are moving, of course, the long exposure would catch that. Sports photography requires large aperture holes and short shutter speeds.
 
Here's a pseudo example of the hand-and-mouse thing I was talking about. It's crappy lighting and I was just trying to pass time at a 50th wedding anniversary party, but whatever:

DSC_0057.jpg
 
You're trying to pass time and there's some kind of delicious-looking liquor sitting right in front of you.....I think I see a solution to your (now past) problem :)


Oh yeah, and very cool shot.
 
wow, all of this info will take me a while to digest, but i think i am understanding the intimate relationship between aperture and shutter speed priorities. on my camera i have a setting that says aperture priority and another that says shutter speed priority, but once i turn the dial there i cannot for the life of me figure out what to do next in terms of adjusting these settings (nor would i know what to adjust them to).

but heres my big question: how come i can use my aperture priority setting inside and do the "mouse trick" you spoke of, but when i was driving today and i pointed my cam at moving traffic in the oncomming lanes it just took a snap shot, not a delayed exposure? i was of course extremely frustrated at this because the whole reason i was excited to figure it out in the first pllace was so that i could shoot moving vehicles. think it had something to do with the time of day (i.e. would it have been a different story if i were shooting at night)?

and, another question i have is, sometimes when i am shooting a pic on "auto" setting, the camera will not take the picture. instead it will beep and flash an exclamation point and a waving hand at me, not explaining what the hell that means. so i miss my photo opp. any advice? by the way those are some spectacular photographs, the kind i spend time searching for on the net all the time, nice work....are you self taught or did you learn all of this in some sort of a course or something?
 
another question is how do i take shots like this one? i took it but i dont know how to make my camera focus in tight on the subject and blur the background....its like in this pic it did it on its own...
DSC00283.JPG


and in the pic below could i make the light in the water come out any better, or was i too far away to do what you did above?
DSC00459.JPG
 
Hey what do you know I learned something! haha I am going to go try this on the cars at night around here and ill let you know how it turns out! thanks again for all of your help, my hobby is blossoming because of it! haha
dsc005326zu.jpg
 
The picture of the tree and water you posted, with the tree in focus and the water out-of-focus, involves (surprise) aperture. What you have in focus compared to what is out of focus (either in the back or fore ground) is called depth of field (DOF). Now, by the laws of physics, a large, wide open aperture creates a low depth of field, similar to the photo you posted, where usually everything except the subject of the photo is out of focus. Conversely, a small, closed up aperture can cause not only the subject to be in focus, but most other elements in the shot as well.

I'm not too great explaining it in great depth, but there are a bunch of good guides on the web, like this one: http://www.cs.mtu.edu/~shene/DigiCam/User-Guide/950/depth-of-field.html

And Wikipedia's article, which is great:
http://en.wikipedia.org/wiki/Depth_of_field

Also, take a look at the photo catstevens just posted in the Boston photo of the day with a shallow depth of field. Likely a very open aperture and a very short shutter speed.

Depth of field can be a lot of fun to play with, definitely try and screw around with it 'cuz some great results can occur!
 
lol yes. I was going to get into the "focus" aspect of aperture, but I figured I had already overloaded you :)

Yes, my picture from Southie looking at International Place over the shipping links was with short shutter speed and wide open aperture
 
You're trying to pass time and there's some kind of delicious-looking liquor sitting right in front of you.....I think I see a solution to your (now past) problem Smile


Oh yeah, and very cool shot.

HAHA! Thanks, and yes, I did have my fair share of that fine wine
 

Back
Top